4616 Roseville Rd #109, North Highlands, CA 95660
E-mail us: us@5-starplumbing.com
Follow us:
Page Title BG

How to Draw a Plumbing Plan for Your Next Remodeling Project: Complete Guide

5 Star Plumbing > Blog > How to Draw a Plumbing Plan for Your Next Remodeling Project: Complete Guide

Creating a detailed plumbing plan is an essential step for any successful remodeling project, especially for kitchens and bathrooms. A well-designed plumbing plan helps you visualize the entire system, prevent costly mistakes, and ensure compliance with local building codes. This comprehensive guide will walk you through everything you need to know about creating an effective plumbing plan that will serve as the blueprint for your renovation.

Why You Need a Plumbing Plan

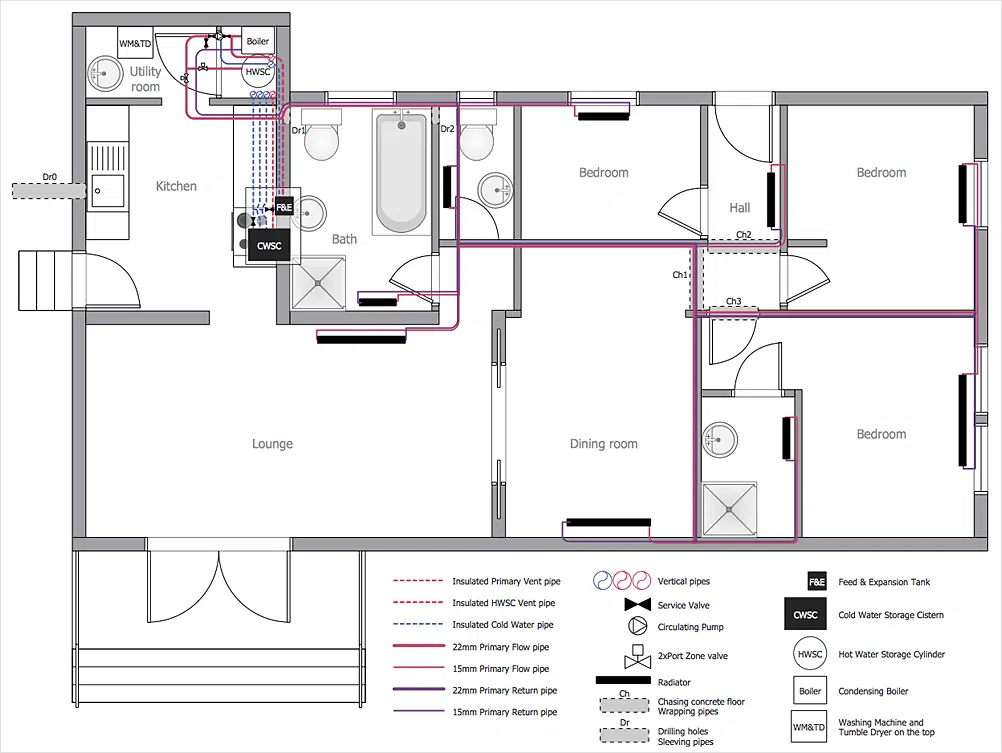
A plumbing plan illustrates the entire system that brings water in and takes waste out of your home. Professional plumbers meticulously map plumbing jobs to prevent surprises, and you should too if you’re planning a DIY remodel. Here’s why a plumbing plan is crucial:
  • Prevents costly mistakes and surprises – A detailed plan helps you identify potential issues before demolition begins, saving you from unexpected expenses and headaches when walls are already open.
  • Minimizes extra trips to the plumbing supply store – Nothing kills momentum like multiple trips for forgotten parts. A comprehensive plan lets you purchase materials efficiently.
  • Helps identify potential issues – Your plan might reveal that moving a toilet requires relocating a load-bearing wall, allowing you to adjust your design before construction.
  • Makes obtaining permits easier – Building officials appreciate thorough plans. Walking in with professional-quality drawings shows you’ve done your homework and often speeds up the approval process.
  • Ensures proper fixture placement – A plan confirms you have adequate clearances between fixtures and walls, meeting both code requirements and practical usability needs.

Essential Elements of a Plumbing Plan

5 Star Plumbing | How to Draw a Plumbing Plan for Your Next Remodeling Project: Complete Guide

A comprehensive plumbing plan typically includes several views to ensure accuracy and proper implementation:

1. Floor Plan

This shows the bird’s-eye view of fixture locations in relation to the room’s layout. It includes:

  • Scale drawings of all fixtures (toilets, sinks, showers, bathtubs)
  • Proper spacing and clearances between fixtures
  • Locations of water heaters and main connections

The floor plan serves as your primary reference, showing how everything fits together in the actual space. It helps you visualize traffic flow and ensures fixtures don’t crowd each other – nobody wants their knees hitting a vanity while sitting on the toilet!

2. Drain-Waste-Vent (DWV) Plan

The DWV plan shows how water, waste, and air will exit your home:

  • Drain lines from each fixture – These carry water away from sinks, tubs, and toilets, typically sloped at 1/4″ per foot for proper flow.
  • Waste lines connecting to the main sewer line – These larger pipes collect drainage from multiple fixtures and direct it toward your home’s exit point.
  • Vent pipes and stacks – Often overlooked but critical, these pipes allow air into the system, preventing vacuum lock that would stop drainage and trap sewer gases.
  • Traps for each fixture – These U-shaped pipe sections hold water to block sewer gases from entering your home while allowing waste to pass through.

A well-designed DWV system is the backbone of functional plumbing. Get this wrong, and you’ll face persistent clogs, slow drains, and unpleasant odors.

3. Supply Plan

This drawing indicates how fresh water reaches your fixtures:

  • Hot and cold water supply lines – Typically shown in different colors (red for hot, blue for cold) to easily distinguish between them.
  • Pipe sizes and materials – Different fixtures require different flow rates, so pipe diameters vary accordingly. Material choices (copper, PEX, CPVC) depend on local codes and your preferences.
  • Valve locations – Strategically placed shutoffs allow for maintenance without disabling the entire house’s water supply.
  • Water heater connections – Proper sizing and placement affects both performance and energy efficiency.

Your supply plan ensures adequate water pressure and temperature at every fixture while minimizing the risk of leaks and water damage.

4. Plumbing Riser Diagram

For multi-story projects, a riser diagram provides critical vertical information:

  • Vertical pipe placement – Shows how plumbing travels between floors, helping identify potential conflicts with joists or other structural elements.
  • Flow direction indications – Arrows showing water movement help prevent installation errors.
  • Stack connections – Details how horizontal branch lines connect to vertical stacks.

Think of risers as the plumbing equivalent of an elevator shaft – they need careful planning to connect everything properly across levels.
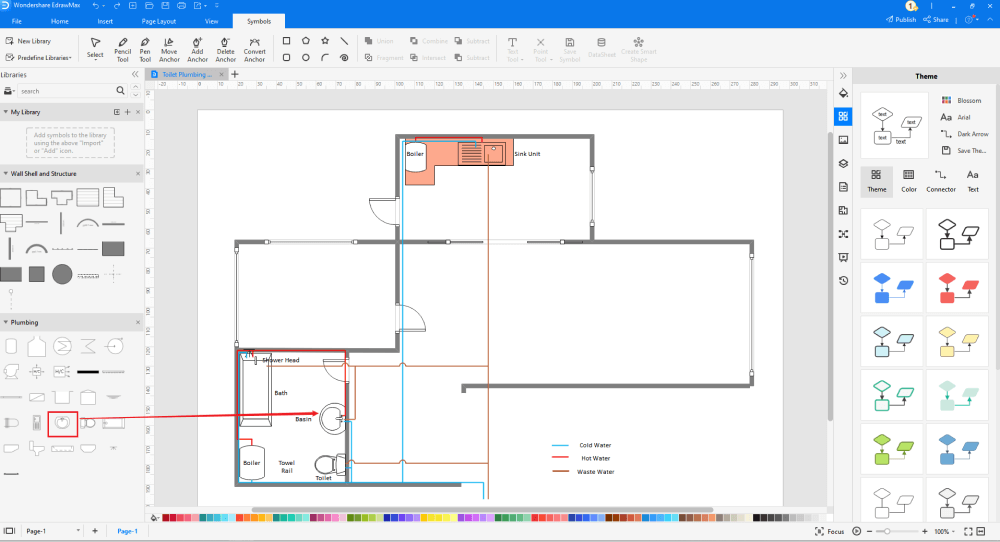
How to Draw a Plumbing Plan: Step-by-Step Guide

5 Star Plumbing | How to Draw a Plumbing Plan for Your Next Remodeling Project: Complete Guide

Follow these steps to create a professional-quality plumbing plan for your remodeling project:

Step 1: Gather the Necessary Tools

You’ll need several items to create an accurate plan:

  • Grid paper or architectural software – The foundation of your drawing, providing scale reference. Professional software offers advantages for complex projects, but good quality grid paper works perfectly for most home remodels.
  • Colored pencils or markers – Color-coding makes your plan much easier to read. Traditional plumbing drawings use red for hot water, blue for cold water, and green or brown for drain lines.
  • Straightedge and triangle tools – Plumbing involves lots of right angles and parallel lines. These tools help maintain precision in your drawings.
  • Scale ruler – Typically using 1/4″ or 1/2″ = 1′ scale, this specialized ruler helps maintain proportional accuracy throughout your plan.

Investing in quality drawing supplies makes the planning process more enjoyable and results in a clearer, more usable plan.

Step 2: Map the Existing Plumbing

Before planning new plumbing, document what’s already there:

  1. Make a scale drawing of the current room layout – Measure and record wall locations, doors, windows, and other permanent features that will affect your plumbing layout.
  2. Mark all existing fixtures – Note the precise location of toilets, sinks, tubs, and appliances that connect to plumbing. This helps identify which supply and drain lines might be reusable.
  3. Identify current supply lines, drain lines, and vents – If possible, trace these through your walls and floors. For older homes, this might require some careful investigation with inspection cameras or strategic drywall removal.
  4. Document pipe sizes and materials – Different eras of construction used different materials (cast iron, copper, PVC, etc.). Knowing what you’re connecting to helps ensure compatible transitions.

Understanding your existing plumbing sometimes reveals surprises – like discovering your bathroom drain runs directly under what would be your new kitchen island. Better to find this out during planning than during construction!

Step 3: Create Your New Layout

  1. Draw all fixtures to scale – Use manufacturer specifications for accurate sizing. Leave adequate clearance around each fixture for comfortable use.
  2. Consider functionality and user comfort – Think about daily use patterns. Is there enough elbow room at the sink? Can the bathroom door swing fully open without hitting the toilet?
  3. Verify code compliance – Local codes specify minimum clearances (typically 15″ from toilet centerline to walls or other fixtures) and required features like GFCI outlets near water sources.

When drawing your layout, remember that plumbing fixtures work best when grouped together. Placing a shower across the room from other fixtures may look nice on paper but requires extensive additional plumbing work and can reduce water pressure.

Step 4: Design the Drain-Waste-Vent System

This critical system requires careful planning:

  1. Mark drain lines with solid lines – Show how water will travel from each fixture to the main waste line. Remember that gravity powers this system, so maintaining proper slope is essential.
  2. Plan vent pipes for pressure balancing – Each fixture needs proper venting, typically within a specified distance (often 5 feet) from the trap. Vents must extend upward, eventually connecting to a main vent stack that exits through the roof.
  3. Position traps for each fixture – Every plumbing fixture needs a trap to prevent sewer gases from entering your home. Toilets have built-in traps; sinks, tubs, and showers need P-traps installed in their drain lines.

The DWV system is where many DIY plumbers make critical mistakes. When in doubt, consult a professional or your local building department for guidance on proper venting configurations for your specific layout.

Step 5: Plan the Water Supply Lines

  1. Draw supply lines with broken or dashed lines – Use different patterns to distinguish them from drain lines.
  2. Color-code hot and cold water lines – Red for hot, blue for cold is the industry standard.
  3. Determine pipe sizes based on fixture needs – Toilets typically need 1/2″ supply lines, while tubs may require 3/4″ for adequate fill rates.
  4. Plan for efficient routing – Keep runs as short and straight as possible to maintain pressure and minimize materials. For hot water lines, shorter distances also mean less heat loss.
  5. Mark valve locations – Include main shutoffs plus individual valves for each fixture. This detail saves enormous headaches during future maintenance.

Your supply plan should prioritize accessibility – avoid running pipes where they’ll be inaccessible behind permanent features. Nothing’s worse than having to tear out a beautiful tile shower to fix a leaking pipe that could have been routed differently.

Step 6: Review for Code Compliance

Before finalizing your plan:

  1. Check local building codes – Regulations vary widely between jurisdictions. What’s permitted in one town might violate code in the next.
  2. Verify minimum pipe sizes – Codes specify minimum diameters for both supply and drain lines based on fixture types and quantities.
  3. Confirm proper venting – Inadequate venting is a common code violation that leads to poor drainage and potential health hazards.
  4. Ensure adequate fixture clearances – Codes dictate minimum distances around toilets, showers, and other fixtures for both safety and functionality.

Many local building departments offer pre-application consultations where they’ll review your plans informally before official submission. This service can save you from costly redesigns later.
Plumbing Symbols for Your Plan

5 Star Plumbing | How to Draw a Plumbing Plan for Your Next Remodeling Project: Complete Guide

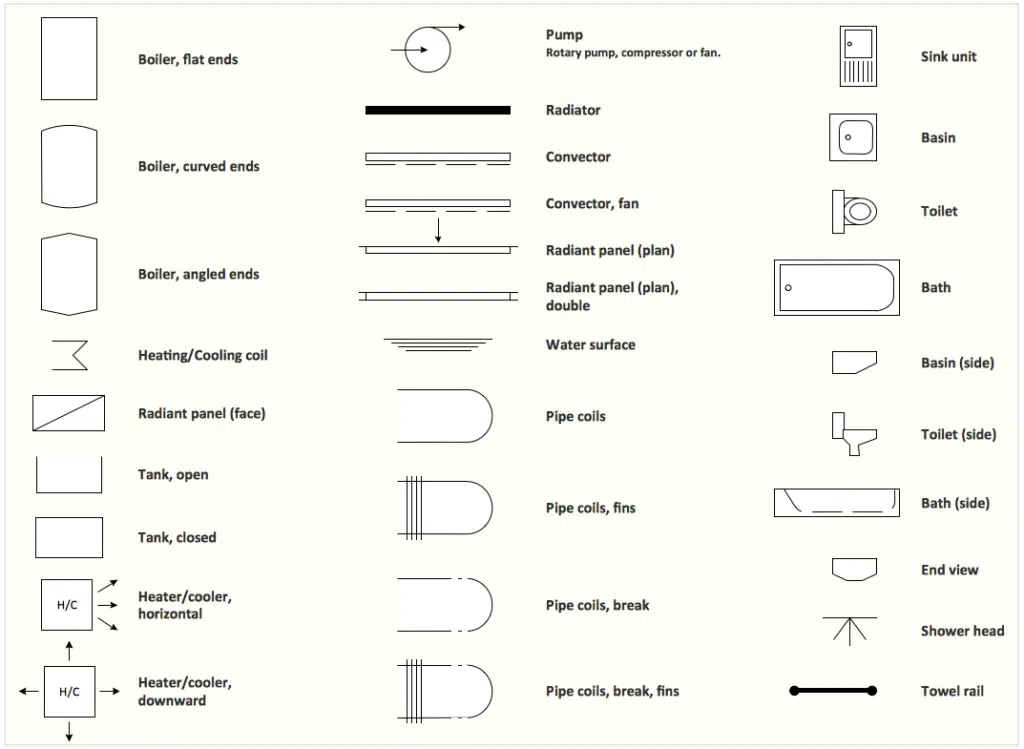
Using standardized plumbing symbols ensures everyone can understand your plan:

  • Toilet: Circle with tank outline – Instantly recognizable, sometimes including a directional mark showing which way the toilet faces.
  • Sink: Oval or rectangle with drain mark – Different shapes indicate different types (pedestal, vanity, kitchen, etc.).
  • Bathtub: Rectangle with curved end – Often includes marks for drain location and faucet placement.
  • Shower: Square with drain mark – May show door swing direction and fixed panels for enclosures.
  • Water Heater: Circle with “WH” inside – Size should reflect actual dimensions, particularly for space planning.
  • Valve: Small circle with “V” mark – Critical component that should be clearly identified for future reference.
  • Vent: V or line with arrow up – Shows how air enters the drainage system to prevent vacuum issues.
  • Floor Drain: Circle with cross inside – Often overlooked but essential in laundry rooms, mechanical spaces, and sometimes bathrooms.

Professional plans include a legend explaining all symbols used. This prevents confusion and ensures your contractor interprets your intentions correctly.

Design and Technical Recommendations

Pipe Sizing and Materials

Choose appropriate materials based on your specific needs:

Copper pipes offer exceptional durability and natural antimicrobial properties, making them ideal for main water lines. They resist corrosion and can handle both hot and cold water, but they’re relatively expensive and require specialized skills to install properly with soldered joints or compression fittings.

PEX tubing has revolutionized residential plumbing with its flexibility, freeze resistance, and simple installation. Color-coded (red for hot, blue for cold), PEX can be bent around obstacles without fittings and connected using simple crimping tools. It’s particularly valuable in remodels where routing rigid pipes would be challenging.

PVC and CPVC provide affordable, lightweight options for specific applications. Standard PVC is used only for cold water and drain lines, while CPVC can handle hot water. Both connect with solvent welding (glue) and are easy for DIYers to work with.

Ensure proper pipe sizing throughout your system. Undersized pipes create flow restrictions and pressure problems, while oversized pipes waste money and can actually reduce water pressure at fixtures. Most residential applications use 3/4″ main lines stepping down to 1/2″ at fixture connections.

Drainage System Tips

Proper drainage depends on several key factors:

Maintain correct slope for all drain lines – The standard 1/4″ per foot provides optimal flow velocity. Too little slope causes stagnation and clogs; too much causes water to outrun solids, leading to blockages.

Minimize bends in drain lines whenever possible. Each 90-degree turn creates resistance and potential clog points. Where turns are necessary, use two 45-degree fittings instead of one 90-degree elbow to create a more gradual direction change.

Size drains appropriately for the fixtures they serve. Toilets require 3″ or 4″ drains, showers need 2″, and lavatory sinks can function with 1.25″ or 1.5″ drains. Undersizing creates persistent clogs; oversizing can prevent proper scouring flow that keeps pipes clean.

Provide adequate cleanout access at strategic points in your drainage system. These access ports allow for future maintenance without demolition. Include them at major direction changes and near fixtures prone to clogging.

Water Supply Best Practices

Efficient water supply design improves both performance and conservation:

Position the water heater centrally to minimize the distance hot water must travel. Each foot of pipe between the heater and fixture means more waiting time for hot water and more wasted water down the drain.

Consider a recirculation system for large homes, which keeps hot water continuously circulating near fixtures. While they use some electricity, they significantly reduce water waste and wait times.

Install pressure-reducing valves if your municipal water pressure exceeds 80 psi. High pressure stresses pipes and fixtures, potentially causing leaks over time.

Group fixtures requiring hot water when possible. Creating “wet walls” where multiple fixtures share plumbing saves materials and improves efficiency.

Common Plumbing Plan Errors to Avoid

Prevent these common mistakes in your plumbing plan:

Inadequate venting leads to slow drains, gurgling noises, and potential sewer gas infiltration. Each fixture needs proper venting according to code requirements. Don’t assume you can connect everything to a single vent – distance limitations and fixture unit calculations determine proper venting configurations.

Incorrect pipe slope creates immediate functional problems. Drain lines need consistent downward slope – typically 1/4″ per foot – to work properly. Check your plans with a level during the design phase to ensure gravity works with your layout rather than against it.

Poor fixture spacing makes bathrooms uncomfortable and difficult to use. Allow adequate clearances around each fixture – generally 15″ from the center of a toilet to any side wall, at least 4″ between side-by-side sinks, and comfortable shoulder room in shower enclosures.

Overlooking shut-off valves turns minor repairs into major inconveniences. Include individual shut-offs for each fixture, plus strategic main valves that section your plumbing system. The small additional cost saves enormous headaches during future maintenance.

Conclusion

Creating a detailed plumbing plan is an investment that pays dividends throughout your remodeling project. It helps prevent costly mistakes, ensures code compliance, and provides a clear roadmap for both DIY work and professional installation. By following the steps outlined in this guide, you’ll be well-equipped to create a comprehensive plumbing plan for your next bathroom or kitchen remodel.

Remember that local building codes vary, so always check with your local building department before finalizing your plans. With careful planning and attention to detail, your plumbing plan will serve as the foundation for a successful remodeling project that functions flawlessly for years to come.

Share:
Peter, plumber

I bring over 9 years of dedicated plumbing experience to the table. As a seasoned professional in the plumbing industry, I've tackled a wide range of projects, from residential repairs to large-scale commercial installations.

Leave a Comment